Thứ Sáu, 26 tháng 1, 2018

Waching daily Jan 26 2018

Natural Cures For Yellow Teeth.

1 Raw Vegetables

One of the ways in which you can treat the yellow film on the teeth is that of eating

raw vegetables.

This includes carrots, celery, broccoli and cucumber.

The abrasive qualities of these natural products are known to scrub the yellow stains on the

teeth and thus help you achieve the goals perfectly.

These should be included in the daily diet to get the best results in hand.

Make healthy salads from these raw vegetables and see how well it gives the outcomes.

2 Baking Soda Mouthwash

Mix well about two tablespoons of baking soda in a glass of cold water and use it to gargle

the mouth well.

This mouthwash should be used 2-3 times in a day to remove the yellow stains on the teeth.

It is one of the top notch ingredients that can be used for the purpose of achieving the

goals.

It helps in treatment of minor stains.

Diluted baking soda can also be used on the teeth for 2 minutes everyday to remove the

yellowness.

This should be done only two times in a week for the first week and then should be followed

every 15 days.

Excessive use removes the natural enamel of the tooth and should be avoided at all costs.

3 Lemon

The bleaching agents in the natural product that we know as lemon is what will help you

remove the yellow stains from the teeth.

You can either gargle the mouth with lemon juice diluted with a little water or else

use the peel of the lemon to rub the teeth and cure the crisis.

Lemon juice can also be mixed with a little salt and then rubbed on the teeth for the

same results.

This should be done vigorously.

Rinse the mouth with normal and plain water after a few minutes.

To remove tartar as well as the yellowness, follow this remedy two times in a day for

the next couple of weeks.

4 Drink Plenty of Water

One of the easiest natural cures through which you can ensure the treatment of yellowness

in the teeth is by drinking plenty of plain and filtered water.

About 10 glasses of water is highly recommended in such a scenario.

This will prevent the formation of any plaque or tartar in the mouth and also flush out

the already existing ones that is causing the yellow teeth.

This natural cure will start giving you visible outcomes in some weeks.

5 Maintain Hygiene

Brushing twice daily in the morning and at night before hitting the bed is one of the

first natural cures that can be done for the removal of yellowness from the teeth.

Apart from this, using dental floss will again remove the tartar from the mouth and trigger

the treatment process.

One should also gargle the mouth with salt and lukewarm water to kill the bacteria in

the mouth that is causing the plague to form and to remove the one that is already there.

Along with removing yellowness, it will help in keeping the teeth healthy and free from

infections.

6 Orange Peel

Rub the teeth with an orange peel at night before going off to sleep.

This is one way in which you can reduce the yellow tinge on the teeth that is causing

so much embarrassment.

It is a safe and natural remedy and needs to be followed on a regular basis to get the

results.

It will also help in fighting the bacteria that accumulates in the mouth at night and

causes yellowness because of the high levels of vitamin C. In only a couple of weeks, it

will give you whiter as well as stronger teeth.

Dried peel can be powdered and used for the purpose if fresh ones are not available.

For more infomation >> Natural Cures For Yellow Teeth - Duration: 3:22.

-------------------------------------------

How to change voice in a video 🎶🎶🎶 - Duration: 3:07.

Hello!

I'm Daria and today I'm going to tell you how to change a voice in a video.

This is the Movavi vlog, let's get started!

In earlier vlogs, we talked about how to deceive the eyes with amazing special effects using

Chromakey and Zach King-style illusions.

But what about playing with the sound?

Why might you want to change a voice in a video?

Maybe you want to make a funny video, prank your friend, or even turn yourself into Darth

Vader.

Our experiment turned out to be funnier than we expected, so we've decided to share it

with you.

So, how can you change a voice in a video?

Let's reveal the secrets!

In this example, we use Movavi Video Editor as it has a built-in collection of different

audio effects.

You don't need to buy or download any plug-ins, everything you need is already there.

At First, add your video to the timeline.

Click the Settings icon and go to the menu.

Choose Audio.

In the open window, you'll find tools like speed and reverse that can be used to change

voices or any other sound.

But if you want your audience to be able to easily understand what you're saying, go to

audio effects.

There's lots to play with there!

For example, applying a very low pitch makes you sound like Darth Vader.

A very high pitch will make even the lowest voice sound like the Gummy Bear.

If you make a movie about an alien invasion or the rise of the machines, the Robot effect

can help you channel extraterrestrial intelligence.

If you need to make your voice sound as if it's coming from old news reports, choose

the Radio effect.

Audio effects are the easiest way to make a very funny video.

Try to apply a couple of effects to your own voice and not laugh.

We couldn't do that.

If you don't know how to record a voiceover for your videos, I recommend you watch this tutorial.

As always, don't forget to subscribe and ring the bell below to be notified about our latest

videos.

Bye-bye

For more infomation >> How to change voice in a video 🎶🎶🎶 - Duration: 3:07.

-------------------------------------------

ISTJ and INTJ ~ How To Tell Them Apart - Duration: 3:59.

ISTJ and INTJ - How To Tell Them Apart

The obvious main difference of ISTJ and INTJ is definitely in its main function, which

is sensing function (Si) and intuition function (Ni).

However, does not mean that it is easy to tell them apart?

It turns out, it is not that simple.

For starter, both ISTJs and INTJs are very good at organizing things, streamlining, and

logical thinking.

They have so many similarities that sometimes made us difficult to tell them apart, but

we will discover everything about ISTJ and INTJ through this short video.

So, if you're new to our channel, make sure to click the subscribe button below, and don't

forget to like this video if you think this video is helpful to you.

As I said before, ISTJs are primary Si users, means they tend to work with information that

they consider to be reliable.

To some extent, that is true of everyone, but for the ISTJ, it is particularly emphasized.

For ISTJs, facts are easily validated than ideas, so they will focus on pursuing them

instead of abstract concepts.

On the other hand, INTJs are primary Ni user, means they tend to focus more on ideas and

possibilities compared to ISTJ.

For INTJs, a new concept and ideas are more interesting to them than just another fact,

because they can explore more to that ideas.

INTJs are frequently marked by a desire to turn the theoretical and untested into a workable

reality.

Be it as it may, here's several things that make ISTJ and INTJ completely different.

#1 - Si and Ni dominance

The dominant Si actually makes ISTJs obedient to rules, regulations, and patterns that they

believe to work for themselves.

They really respect the structure as long as it is made by authority or expert.

Meanwhile, the dominant Ni of INTJ finds the meaning from their own observation.

They find the significance based on their intuition and they can decipher the pattern

on how this world works.

While working in their magic, sometimes they do not realize that they are accessing their

subconscious thought.

We see them quite often when they are fading out.

#2 - Se and Ne Inferior

INTJ has inferior Se which makes them unable to have fun with thrilling experience.

They tend to think that impulsive and thrill seeking behavior are meaningless.

They also do not care too much about the world which makes their life rather boring.

ISTJs, however, are thinker but they do not like theorizing things.

It is due to the fact that ISTJ are stricter to the rules and this somehow limits the way

they think.

#3 - Problem solving process

INTJ is actually more capable in problem solving situation.

The reason is because they are open to new ideas and suggestions.

Meanwhile, ISTJs do not want to experiment because they only stick to proven strategy

for solving particular problem.

Some people may see this as disadvantage of being ISTJ.

However, it is not totally true.

ISTJ can see details better than INTJ, and it also allows to ISTJ to think whether particular

problem can be solved with the usual method.

All in all, that's the main differences between ISTJ and INTJ personality type.

Really cool information isn't it?

Please share your thoughts and experiences in the comments below!

Don't forget to subscribe to our channel and watch all our other amazing videos!

Thanks for watching!

For more infomation >> ISTJ and INTJ ~ How To Tell Them Apart - Duration: 3:59.

-------------------------------------------

Should You Exfoliate Your Pout? - Duration: 1:49.

For more infomation >> Should You Exfoliate Your Pout? - Duration: 1:49.

-------------------------------------------

Fortnite Chest *In Real Life* Fortnite: Battle Royale! NEW - Duration: 17:01.

Welcome to HowToCookThat, I'm Ann Reardon and today we are making a

treasure chest cake from the game Fortnite. My older boys and I have been

playing this game over the holidays we always seem to pick a game to play each

holidays and this time it was Fortnite so that's what we have been playing. The

chest is actually made from gingerbread and the base is made from cake. So to

make our wooden gingerbread planks you will need butter sugar flour glucose

syrup. Now normally I'd use half glucose and half molasses but I want to slightly

lighter coloured gingerbread so I'm going to use all glucose for this one.

Bicarb of soda, milk, ginger, cinnamon and cloves. Now you can take out the ginger

if you don't like ginger and change that and just have cinnamon and cloves or

just cinnamon a little bit of grated orange whatever flavor you'd prefer. All

these recipe quantities are on the howtocookthat.net website for you and

the template is there too and I'll put a link to that in the description below.

Add the sugar in with the butter and mix that on low speed and then add in the

glucose syrup ... you can swap this for a light corn syrup if you don't have

glucose syrup where you live. Add in the cloves cinnamon and the ginger ... I think

my bowl was a bit too full there, we're just powder everywhere. Now we need to

add the flour and the milk ... I am totally out of room so what I'm

gonna do is tip the rest of the flour onto the counter and then tip the

mixture on top of that and mix it together kneading the flour into the

mixture until it forms a really soft dough like this. Place about a third of

the dough onto some baking paper and before you start rolling it shape it

roughly into a rectangle shape so that it's easy to get it into the corners and

then place the next piece of baking paper over the top and roll it out to

about one centimeter thick. Take off the top sheet and add your template into

place and cut around it using a pizza cutter for all of the straight cuts. Now

if your template is sticking to the gingerbread a little bit like mine is

just sprinkle some flour onto the gingerbread dough

first and then it won't stick. We want to leave some extra bits of dough

around a shape and that's because it helps keep the gingerbread in the right

size and it also stops the corners from getting overcooked in the oven. Mark

where the planks are supposed to go and you can use a pizza cutter or a ruler to

cut the planks ... cut them right through on the front and back pieces of the chest

but when we get to doing the side you just want to indent them don't cut them

the whole way through. Some of the planks are a slightly different colour so I'm

going to use a dry paintbrush and just brush on some cocoa powder to give them

a slightly different colour. Add some more cocoa powder between each plank and then

indent on the end of the wood just using the ruler there just a bash of the bit

so it looks like it's a bit older. Now use your knife to make lines on the

surface of the dough the lines should be slightly wavy with the occasional knot

in the wood just to give us that woodgrain look. Cut out your other pieces

in the same way just texturing them all with your knife and shading them with

the cocoa powder and then bake them in the oven. Part the way through baking

redo any of the cuts that go the whole way through and then shape the bottom

front edges up a bit by adding some foil under the baking paper so that those

planks just curve a bit. I'll show you that from the side so that you can see

what I'm doing ...you've got your baking paper

you've got the foil just sitting underneath so it's making it come up

slightly. One important thing with gingerbread is being able to tell when

it's done because when it's hot it can still be quite soft and a little bit

bendy. If you're not sure if it's done you can let it cool and once it's cold

if it's not firm if it's still really soft just put it back in the oven for

another 10-15 minutes because we really need this to be firm because we need it

to hold its shape otherwise it's just going to fall apart. The other way you

can tell if it's done is to flip a piece over if the back feels dry it's done if

the back feels really wet and moist then just leave it upside down and chuck it

back in the oven to dry out. Once that's all baked we've got some fondant pieces that

need making ahead. Put some baking paper over the handle template and shape a

thick snake of black around the handle ... you can leave this round it but in the

Fortnite game they're a bit more chunky and cartoony because of the way the

graphic artist has drawn them. Then just join those ends together with a little

bit of water and use your knife just to square it off a bit. Cut around the lock

now this needs to be quite thick and cut off the corners and then round them out

using the edge of your knife. To make the hole I'm using a piping tip now if you

don't have one of those just try using a straw instead it cuts really good

circles. Then cut straight lines of the keyhole and remove that bit of fondant.

Use a smaller round piping tip to make indents for where the nails are on each

corner. Cut out the two unusual shapes now these go on the side of the lid I

think they're supposed to have something to do with the opening mechanism of the

chest but I'm not exactly sure. They look a bit plain to let that a few details to

them and then the only other thing we need to make ahead is these circles ...you

need six in this size and then another four smaller ones and then we want to

dust all of those with silver luster dust and dust the lock and the handles

and those weird side bits too so that it's all silver and then we'll just

leave those to one side to dry out. I'm pretty happy with how this woodgrain

look has turned out on the gingerbread the cocoa powder's coloured it nicely the

wood grain looks good ...now we just need to put it all together. So to start with

lay out your bottom pieces and your two side ones and cut the board to be the

same shape as your pieces as you can see mine are a little bit different to each

other so that's why my board looks a little bit weird but just make it match

how yours have turned out. Then take some melted chocolate and make sure if your

chocolate has cocoa butter in its ingredients that you temper it first

watch my video 'CHOCOLATE SECRETS' on how to do that if you don't want to temper

buy compound chocolate that has no cocoa butter in it. Then you can see this

one is a bit broken you can just repair that with

a bit of chocolate and then pop that into place on the edge ... put this one here

and use a cup to hold that. Now you can get these make it a great week cups from

the merch store there's a link to that below (quick merch shout out there 😊) if you

use the handle of the cup then the base won't get stuck in the chocolate rather

than just using the straight side. Do the same on the other side now I'm a bit

worried about these walls falling outwards so I'm going to add more

support on both sides that seems a lot safer to me. Add some chocolate up the

sides and add that plank into position. Stack your other planks using more cups

to support them while the chocolate sets and do the same on the other side and

then you want to cover the whole inside with chocolate to seal any little gaps

that you might have in your chest. Use chocolate to glue that little strip of

gingerbread across the base there and now we want to make the lid. To start

just put it like that and balance those two up so you can see what I'm

trying to say next put the center one there and then when you put this one

here because of the angle they're on see how the bottom corners are going to stop

the tops coming together ... so we need to shave off the bottom corners. So just

grab a finely serrated knife and run it along your gingerbread now this is

really messy so I usually do it over the sink but I'm doing it here so I can show

it to you and you need to do that on the other piece as well and then when you

put them together see how now they come together and they sit neatly next to

each other. Once you've adjusted all your planks you can put the two end pieces on

top of the base and then use chocolate to put each one of those planks into

place, now the planks should stick out beyond the ends and you'll notice that I

didn't add chocolate underneath the half circle bit here because I want to be

able to take the lid off. Once all those pieces are set in place take the lid off

the chest turn it upside down and then line the

lid with chocolate now this is going to give it more strength but it's also

going to make sure that our gas will only get out of the gap under the lid

and not everywhere where there's little gaps between our planks. Cover a cake

board in foil and using a little bit of buttercream to hold it in place add cake

randomly over the top there's no real pattern to this just make sure you have

a flat area under the chest and the rest is however you want it. Cut some cake

pop sticks to the height of your cake and poke them in one for each corner and

add a couple in the middle just for extra support.

Then add the chest on top and the cake pop sticks to stop the chest from

squashing the cake underneath. Cover that whole thing in grey buttercream and then

anywhere where you can see lines so it looks like it's buttercream and not a

rock just gently tap it down to make it look a bit more like flat ground. There

are so many different ground textures in Fortnite particularly in the new

release so I'm going for the ones where there is a chest sort of in a clearing

on the top of a mountain where it's got that different colored grey and then

it's got a bit of grass so just try and smooth that out. Take your leftover

buttercream and spread it on some baking paper and chuck that in the freezer for

about 20 minutes ... you can color some with a darker shade

of grey and do the same thing with that if you want to. I just realized I forgot

something really important the light has to go in ... I should have done this before

I added the buttercream but that's okay. I'm using a really bright torch for this

and just wrapping it in orange lighting gel and then I'm going to put the whole

thing in a clear plastic bag to keep it dry. This one turns on just by pressing a

button on the top which is perfect for how we want it and then what I'm going

to do is just scoop out some cake from right in front of the chest and add the

light into that hole. Then pipe some buttercream around it just to hide the

torch. Take your frozen buttercream and cut it into chunks so it looks like

little rocks and just scatter them around the place wherever they are I'm

gonna do them in two different colours. Roll out some green fondant and use your

knife to cut three or four long thin curves then just pinch and twist them

together for a tuft of grass. You want to make lots of those all different shapes

and then just leave those to dry out for a minute.

Cut two strips of black to the width shown on

the template and brush them both with silver. Wet the back of the strip and

push it onto the chest at the top of one side. just cut that to length and then

use a knife or a blade underneath to straighten it up so that it looks like

it's metal. Put a little water on your finger and rub off a bit of the silver

so the chest looks a bit old and rustic instead of brand new. Wrap a snake of

black around the top of your handle and brush that with silver too then put a

little bit of water on the back and add that to the strip we just put on. Now

while that's drying it's a bit heavy so you'll need to support the weight ... I'm

just going to use an offcut of gingerbread just to hold that up and

once it's dry we can take that out. Cut two strips of fondant brush them with

silver and add them around the chest from the bottom at the front all the way

around the back ... you just want to trim them to size and then cut through where

the lid joins the chest so that we can still take that off. Use a little bit of

water to add one of the circles that we made earlier and add an indent there and

then use a piping tip to add circles for nails in the center of each wooden plank

and then add another circle there. On the left hand side there's a piece of metal

missing I'm not sure how you'd actually damage the metal on a chest like this

without destroying the wood underneath but that's how the artist drew it so

that's how we'll make the cake. Use a bit of wet paper towel then to distress down

the middle of the metal strip taking it back a bit to black. Cut out the two

chunky lock pieces and brush them with silver and then add the bottom one into

place making sure it's wide enough to fit around the middle part of the lock.

Now take your serrated knife again and mark where the lock goes on the lid and

shave away that part so that the lock will sit flat when you add it into place

and you just want to attach that at the bottom half not the top again so that we

can get the lid off. your grass should be dry enough by now so you can poke those

into place all around the cake. I'm going to put a jar of Slurp Juice inside

my chest with some dry ice in it so that we can

get that vapor coming out of the chest! You can put whatever you want in your

chest lollies (candy) would be good but you're not

going to be out of fitting an AR, a med kit or an RPG ... when they spring out of the

chest they're much bigger than what the inside of the chest would fit. How cool does that look!?

It looks just like a Fortnite ches! For those of you who have no idea what Fortnite Battle

Royale is I'll show you one of my games sped up. Now I must warn you I don't

usually like first-person shooter games so I don't usually play them so I am

absolutely hopeless with a gun. So unless I can take time to carefully line it up

I am going to get shot before the other person does that means I have to play a

much more strategic game. So I land right near the edge of the map where

there's less people and then I make my way into the circle with the storm

behind me so no one can get me in the back. It starts with a hundred players

and the last player standing wins, a bit like a Hunger Games kind of vibe. Now you

can play gung-ho and try and eliminate as many people as you can or if you

can't shoot and you're a bit more of a pacifist like me you can just stay

hidden and let everyone else battle it out. It tells you how many people are

left here and the circle that you have to be inside gets smaller and smaller so

it brings everyone together. If I was an aggressive player I would get this guy

over here yeah but I'm a hundred percent sure that if I shoot at him he'll turn

around and shoot at me and decrease my shield and my health so I'll just wait

here and let him go first. If my boys are watching me play they get so frustrated

when I do this ... they just go "Mum shoot him!" Once he's gone I can go up his ramp and get into the

circle and then I'll put on the bush that I have ... now I'm recording this game

before the new map update ... the bush is still Christmassy 🎄

Spewing (happy Australia Day) the new circle is not on my side ... now walking bushes are a teeny bit obvious

especially with flashing lights on them so I'm gonna need to move slowly around

objects. I'll just speed this up for you ... okay I'm in the circle and there are now

eight people left make that seven, now five ... someone is

building up there and there's a drop so while they're distracted by that I'm

gonna move into the next circle I have no idea where the other three people are

and this circle is getting pretty small now. Oh there's someone they're running in. And another person is to my right shooting RPGs...

The guy behind me has just jumped out of his base to get the loot. So there are three people left with me, one there

I can just see one person hiding in there and where's the RPG guy? There he

is he has just used a jump-pad to get into the circle ... so while they're all

distracted battling each other I'm gonna move into the next circle. That's it he

got those other two people really quickly and there's only two of us left

and now I know where he is and he has no idea where I am so I can carefully line

up this shot ... YES! There you have it, Victory Royale! I'm quite sure if he had have had more health then he would

have won because if it had a chance to shoot back at me he probably would have

got me but anyway I still won fair and square ... strategy won the day! Click here

to watch more game cakes, here for chocolate, here to subscribe and here for

my latest video. Make it a great week and see you on Friday 💕

you

For more infomation >> Fortnite Chest *In Real Life* Fortnite: Battle Royale! NEW - Duration: 17:01.

-------------------------------------------

6 Causes of Neck Pain You May Not Be Aware Of - Australia 365 - Duration: 8:14.

6 Causes of Neck Pain You May Not Be Aware Of

Neck pain, also known as cervicalgia, is an uncomfortable symptom that tends to be produced by the muscular contraction in this area of the body.

It starts with a strong sensation of tension and stiffness, which often makes normal head movements difficult when doing daily tasks.

Its normal for those who live a sedentary lifestyle, but it can also occur among those who work a desk job or those who do physical activity that requires a lot of force.

While it isnt serious and usually comes about sporadically, its essential that you identify the causes of neck pain so that you can combat it and avoid other complications.

Keeping in mind that many people dont know the habits that can influence its appearance, we want to continue by sharing the 6 main ones.

Spending a lot of time in front of the computer.

Do you suffer from neck pain when you spend a lot of time in front of the computer? If so, you should keep in mind that the posture your body takes while performing this activity can be responsible for this symptom.

This is because the muscles in the area get tired and tense up, especially when you stay in the same position for a prolonged period of time.

Suggestions.

Keep good posture while sitting and, in addition to this, take periodic breaks to stretch.

Elevate your computer screen to a height that doesnt require you to bend your neck.

Using mobile devices incorrectly.

One of the reasons that the number of patients with neck issues has increased is due to the extended and incorrect use of mobile devices.

These devices, including phones and tables, cause us to adapt inadequate posture for long periods of time.

As a result of this, the neck muscles tense and are more susceptible to injury.

Suggestions.

Limit the use of these devices as much as possible.

If you cannot disconnect yourself, make sure that youre using them correctly, without hunching your body too much.

Do strengthening exercises to reduce tension.

Having bad posture while sleeping.

Good, quality sleep allows us to relax our muscles to prepare ourselves for a new day.

However, if we have poor body posture while sleeping, its very probable that you will increase neck and back pain.

Suggestions.

Keep in mind that, to get rid of these issues, your neck should stay aligned with your spinal cord, regardless of if you sleep on your side or facing up.

Your head shouldnt be too elevated because this increases the probability of injury in this area.

Putting too much weight in your backpack or purse.

Be careful! Even though packing your backpack and purse is a daily thing, doing it incorrectly can be one of the causes of neck pain.

Carrying them poorly, or adding too much weight to them, can bother the muscles in this area.

Suggestions.

Avoid packing your bags with too much weight, especially if you have to carry it for an extended period of time.

Dont carry your backpack on just one side of your body.

They should not weigh more than 10% of your body weight, especially for children.

Smoking.

The toxins in cigarettes dont just negatively impact your pulmonary and cardiovascular health, but also, with time, interfere with your muscular health.

They impede the oxygenation of your muscles and increase dehydration and muscle pain.

Their accumulation in the body can deteriorate the disks in your back and body.

This increases your risk of a herniated disk, neck stiffness and muscular and articular debility.

Suggestions.

Try to quit your smoking habit as soon as possible.

Use detoxification methods to help eliminate the toxins that have accumulated in the body.

Avoid exposing yourself to environments contaminated by cigarette smoke.

Doing ab exercises incorrectly.

We cant deny that abdominal exercises have a lot of benefits for our body.

However, if you do them incorrectly, they can be a cause of neck and back pain.

Even though at first you may not notice it, the muscles that surround the neck can be bothered by putting force on this area.

Suggestions.

Center the physical force on your abdominals and not on your neck.

Keep your gaze upwards.

Keep space between your chin and your chest.

Do you have constant neck pain? If so, its possible that one of these daily habits is influencing its appearance.

Try to take the necessary measure to reduce it and, in addition to that, try to exercise in order to strengthen and support this area.

For more infomation >> 6 Causes of Neck Pain You May Not Be Aware Of - Australia 365 - Duration: 8:14.

-------------------------------------------

💲💲💲 3D PRINTER COST 💲💲💲 - Duration: 10:15.

Welcome to my new video! In this one I will discuss about 3D printing cost.

I always get requests to print and design something. Almost always I reply: design

can be quick and easy, but the prints are not cheap and fast!

Why? Let's see. I discuss what parameters influence the total cost and

how to calculate it. It's a bit tricky! My final goal here is to make calculations

in a format: per print hour cost + filament cost, as this is the quickest

way to give out the final number. If you are one of those geeks who will print

something anyways regardless the cost, skip this video, but don't forget to hit

LIKE, COMMENT, SHARE and SUBSCRIBE! Subscribers will be informed about new

videos when they are published.

Welcome to my youtube channel GreenEyedExplorer,

where I explore further and beyond about tweaks, hacks, electronics and

house repairs.

So let's start at the beginning!

I will go over parameters in

logical order. Answering this complex question of cost is not 100% as there

are many parameters and I will probably miss some minor cost! At the end I will

show an example. I will slice an owl statue from Thingiverse in Cura slicer.

First! First one is initial printer cost. This brings a plethora of variables. Most

are assumptions. As I have already mentioned in my previous videos my

printer costs around 350€. Upgrades were 100€, not calculating my

research, failure and build time. I estimate the printer worth is around 500€.

I assume that anything you buy nowadays lasts around 4 to 5 years. After

that it is either outdated or it is worn out to the extent you cannot

get spare parts anymore. So 5 years it is! Its lifetime

surely depends on printing hours. I could again assume home printers are meant to

run maximum 1-2 hours per day in its lifetime.

This makes between 1800 and 3600 working hours. Middle is around 2700, so the

working our cost is whole price divided by working hours.

In my case 18.52 cents per hour. Let's advance further! Electricity cost! I do

most of my prints during the day as I want to supervise them. In my country

1 kWh costs 16.6 cents. My printer has 2x 100 watt power supplies.

Luckily, I measure all individual power consumers in my house

via my own home automation system. Startup heating takes full power, but

afterwards they on average consume 140W per hour.

This makes 2.32 cents per hour.

3. While printing you need consumables

like duct tape, glue, cleaning equipment, certain tools... Cost is very

hard to calculate. Not to even mention printer spare parts, if we are talking

about maintenance. There are bearings, belts, motors, extruder,

wire, grease, SD cards... Thanks to cheap China suppliers, these rounds to about

20% of total initial printer cost in printer lifetime. Assumption is made on

many internet sites I have reviewed for this video. Out of 2700 total work hours

this makes 3.7 cents per print hour.

Next one! Hardware and software cost.

Personal computer, operating system, slicer software... As we almost always can

find old computers and we can use free Linux and free slicers, I will conclude

0 cents per hour. I do not want to make a 10 hour video on PC peripherals.

I assume we quickly process the object, save the g-code to SD card and insert it

into printer. So no additional electricity cost from PC. Many 3D object slicers

calculate the required filament weight for the object. This is not the end object

weight! Many times there are supports and rafts. These are removed from the object

at the end. It is best to use slicers' values, as they are accurate, if your

settings in the slicer are correct. Verified from my side. The only thing

that many times deviates from slicers' calculations are print time estimates.

We should also calculate shipping too! Maybe we should consider filament type and

storage maintenance?!?

6. Another important parameter regarding our printing is

failure rate! Even experienced manufacturers have failure rate. Well

just 1% according to google search. Average user around 10-20%.

Mostly depending on the filament used and print speed. PLA has the lowest

failure rate. So I will presume failure rate of 15%.

7. During every print we also

have to supervise the process. I found out nobody really

considers the learning curve as a cost too.

This means there is our personal cost per hour.

I chose owl statue from Thingiverse.

I use latest Repetier-host and letest Cura slicer.

You can see them run in parallel. In both cases I slice with Cura. Object is down-scaled to 50%.

0.2 millimeter layer height. I used PLA filament. It costs 40€ per kilogram.

Shipping included. So 1g makes 3 cents.

As you can already see, the inbuilt Repetier Cura slicer makes more cost.

I cannot figure out the Cura version in it. I have to mention the standalone Cura

slicer is a completely rewritten and most up to date.

You can also see the infill makes a great difference in cost!

I decided for 10% infill. This takes my 75 minutes and 54 cents of my money for

the filament. In example summary: initial printer cost and upgrades make 23.15

cents, electricity costs 2.9 cents, consumables 4.62 cents,

hardware and software 0 cents, filament, as I said, 54 cents.

I will not ship it, is for me. My personal cost remains unknown.

That together makes up to 84.67 cents + my personal time.

If I calculate my failure rate of 15% in the total cost,

this makes 97.37 cents + my personal time.

While gathering statistics on internet I found there are even some online calculators.

You can see the links in the description below. Most of them just calculate

filament and electricity cost. The most interesting one is the last one, which

considers most of my parameters too. The suggested values differ a bit, but I'm

sure of mine, as I have proven them or have them founded throughout the internet.

While searching I have also found many 3D printing services throughout the

world. Some of them are listed below. Thank you for watching this video!

Don't forget to hit LIKE, COMMENT, SHARE and SUBSCRIBE! And see my other videos on YouTube!

For more infomation >> 💲💲💲 3D PRINTER COST 💲💲💲 - Duration: 10:15.

-------------------------------------------

Switching to a TLD - Duration: 1:17.

Manolo Macchetta emailed us from Milan saying,

"I had a .info domain but I changed it to a .xyz domain.

"Traffic is much lower now.

Do you know if new TLDs rank as well as others?"

Well, your question leads to many more questions in my head.

First of all, did you 301 redirect the old domain to the new domain,

every individual page on the old domain to the new one?

And if yes, did you wait for about six months for your traffic to recover?

Because that's about how long it can take for traffic to completely come back

when you do a site migration like that.

If you didn't do either of those, then do them and wait.

If you did both, well then something else is probably wrong.

Rankings are not tied to top-level domains,

so it doesn't really matter if you have a .info, a .xyz, a .com, a .travel, whatever.

What matters is the quality of your content

and whether you've properly redirected all the old links to your new domain.

Good luck.

For more infomation >> Switching to a TLD - Duration: 1:17.

-------------------------------------------

Real Age Of 15 Bollywood Stars Will Surprised You - Duration: 5:48.

Real Age Of 15 Bollywood Stars Will Surprised You

For more infomation >> Real Age Of 15 Bollywood Stars Will Surprised You - Duration: 5:48.

-------------------------------------------

How are you treating children? How to deal with children, know - Duration: 3:28.

শিশুদের সাথে কেমন আচরণ করছেন?

How to Behave with Children?

শিশুদের সাথে কখন কিভাবে আচরণ, জেনে নিন

For more infomation >> How are you treating children? How to deal with children, know - Duration: 3:28.

-------------------------------------------

Try Not To Laugh (Vine Edition) IMPOSSIBLE CHALLENGE #1 - Funny Vines 2018 - Duration: 8:29.

Try Not To Laugh (Vine Edition) IMPOSSIBLE CHALLENGE #1 - Funny Vines 2018

For more infomation >> Try Not To Laugh (Vine Edition) IMPOSSIBLE CHALLENGE #1 - Funny Vines 2018 - Duration: 8:29.

-------------------------------------------

6 Things You May Not Know About Gustaf Skarsgård (Floki actor in Vikings) - Duration: 2:25.

Gustaf Skarsgård is a Swedish actor.

He is best known outside Scandinavia for his role as Floki in the History Channel series Vikings.

Born on 12 November 1980, he is 37 years old in 2017.

Let's see some interesting facts from his life.

1. His father is an actor

Skarsgård was born to the Swedish actor Stellan Skarsgård.

His mother was a physician.

He was raised up along with his five siblings:

Alexander, Sam, Bill, Eija and Valter and two half-brothers.

Alexander, Bill, and Valter are also actors.

He attended schools all over the world due to traveling with family for his father's location shoots.

2. Began acting at age 9

Being a son of an actor, he was highly passionate towards the acting field.

In 1989, as a nine-year-old, Skarsgård acted in the much acclaimed Swedish thriller Film Codename Coq Rouge

3. An ensemble member of the Royal Dramatic Theatre

After attending theatre academy in Stockholm from 1999 to 2003,

Skarsgård joined the Royal Dramatic Theatre.

He played in several stage shows and drama including Shakespeare's and Söderberg's works

on different stages in Stockholm.

4. Directed a short film

Skarsgård made his directorial debut and made the short film People of No Significance in 2011.

He wrote the screenplay for it as well.

5. Was married

Skarsgård was married to actress Hanna Alström from 1999 to 2005.

They didn't continue their married life and got divorced after six years.

Currently he is single and is not associated with any other relationships or affairs.

6. Online chats in forums for drug users

Skarsgård is a committed actor.

For the 2008 movie Iskariot, he did various researches for a role as a heroin addict

by participating in online chats and forums for drug users.

Later, he did lose a significant amount of weight as well

for his role as an escaped WWII Prisoner of War in 2010 film "The Way Back".

Thanks for being with PersonalX

If you like our videos please comment, like and subscribe

Thank you

For more infomation >> 6 Things You May Not Know About Gustaf Skarsgård (Floki actor in Vikings) - Duration: 2:25.

-------------------------------------------

Comparing Yourself to Other Maids - Who Wins? - Duration: 5:57.

How do you compete with other house cleaners?

That's an excellent question and we're going to talk about that today.

Hi there, I'm Angela Brown, and this is Ask a House Cleaner.

This is a show where you get to ask a house cleaning question,

and I get to help you find an answer.

Now, today's show is brought to us by HouseCleaning360.com

It's that time of year where we're all cooped up inside the house, and we're trying to stay

warm, it's a perfect time to clean out all your cupboards, and all your closets, and

your toy boxes, and all the things that you've been putting off during the nice summer months

when you want to be outside.

If you're not sure how to go about that process, you may want to consider hiring a professional

organizer, who can come in your house and help you through the process of getting rid

of the clutter, and the stuff that you no longer need, use, or want, and help you find

a place for the stuff that you do want to keep.

You can find a professional organizer at HouseCleaning360.com

Now, if you're a professional organizer, and you don't have your business listed there,

hurry on over and get yourself a listing so we can send a business your way.

On to today's show, which is a question from a woman who wants to know this.

Speaker 2: I Angela, I have a question for you.

I have friends who cleans like me, but they always tell me they do five, six houses a

day, I can barely do three houses, how can that is possible?

Angela Brown: Okay, so you are wanting to, if I understand correctly, you're wanting

to compete with other house cleaners.

All right that's not going to happen.

First and foremost what you need to realize is that you are your own business.

And you work at your own pace, and you earn your own money, and you pay your own bills.

For you to try to compete with another house cleaner, or another series of house cleaners

who have a different business model then you, it's going to be difficult, because we don't

know exactly what they're doing, and we don't know the ins and outs

of the houses that they're cleaning.

Now, I know it's easy to say, "Well they're cleaning five houses, and I'm only cleaning

three, what am I doing wrong?"

You're probably not doing anything wrong at all.

If you're cleaning three houses in a day, you're doing something right,

that is something awesome.

Okay, now first and foremost, you have to understand that a lot of house cleaners just

like everyone else, sometimes stretch the stories just a little bit.

If it's a single house cleaner, and they're cleaning five houses in a day, really?

Really?

Because if you clean houses, and you're working from sun-up till sun-down, and you're only

doing three houses, you kind of know, that might be a little bit of a fib.

All right, now they might have a team.

If there are two or three people, it is possible that they could do five houses

in the course of a day.

Maybe they were skipping some information that they were sharing with you.

Another thing we have to consider is not all houses are equal, right?

I live in a neighborhood where houses range from about 1600 square feet, all the way up

to 8800 square feet.

At the beginning of the neighborhood, there are these little ranch style homes, and then

as you go back to the back of the neighborhood, the houses get bigger, and bigger, and bigger,

and they have basements to them, and they're just much, much larger homes.

It's the same neighborhood.

Even if they're cleaning houses nearby to you, and the houses are kind of the same,

houses are hugely different even in the same neighborhood, so are they cleaning five houses

that are 1600 square feet, or are they cleaning five houses that are 8800 square feet?

Because you and I can both do the math on that, and go like, "Hmm, I don't think so."

Right?

Then it depends on what are the customers having them do when they're inside the house?

For example, we had a customer, and all they wanted us to do was to sweep and mop the floors,

that's it.

They had lots of hardwood, and they vacuumed all their own carpets, and they cleaned the

rest of their house, and they did the bathrooms,

and they did everything else, except sweeping and mopping.

To go to that house, and only do the sweeping and mopping, it would be irresponsible to

say we cleaned their whole house during a certain period of time, when really all we

did was sweep and mop the floors.

If you're comparing yourself with other house cleaners, which I recommend you not doing,

just don't do that, if you are the business owner, and you have other house cleaners that

are under your care, you can compare them, because you've trained them the same way.

You're using the same supplies, you're using the same system, you have the same customers,

and you can take a person from here to this house, and then a person from here to this

house, and they can clean the same area, and then you can compare the times.

So if somebody's doing five houses in the course of a day, and you're only able to do

three, chances are the houses they're cleaning are in better condition, or they are cleaner,

or they are better maintained, or it's more of a regular cleaning than what you're doing.

I'm not saying it's impossible to do five houses in a day, but it sounds like we're

missing a lot of information there.

First and foremost, don't compare yourself with other house cleaners, because that will

make you crazy.

Then when they tell you how much money they're making, that will also make you crazy, because

like I said, sometimes there's a tendency to stretch things a little bit.

There's no need to compare yourself with anyone else, you're your own business owner, and

like I said, you have your own rules, and your own systems, and your own way of doing

things, and you earn your own money, and you pay your own bills.

It's easy to get caught up in all the hype of what other people are doing, but don't

do that, just say, "Hey, keep your nose to the grindstone, this is my business, I'm doing

the best I can.

I'm making a good living for myself.

That's all that matters."

Don't compare, don't, it will make you crazy, I'm not kidding you.

All righty, that's my two cents for today.

Until we meet again,

leave the world a cleaner place then when you found it.

For more infomation >> Comparing Yourself to Other Maids - Who Wins? - Duration: 5:57.

-------------------------------------------

Natural Ways On How to Remove Blackheads In Ears - Duration: 3:56.

Natural Ways On How to Remove Blackheads In Ears.

1. How To Remove Blackheads In Ears With Rubbing Alcohol

Do you want to know how to remove blackheads in your ears naturally? Then follow this method

to make blackheads vanish overnight. Basically, rubbing alcohol sterilizes your affected area

and even destroys the blackheads causing bacteria more quickly.

You need to prepare:

1 tsp of rubbing alcohol Cotton balls

Directions:

Take 1 clean cotton ball, saturate it with rubbing alcohol and then squeeze out the excess

alcohol gently. Presently, apply all over the blackheads with

this cotton ball and leave on the application entire night.

Discard the cotton ball in the next morning and clean the area using plain water.

Follow this process very night for one to three days to reveal a clean skin free from

blackheads in ears.

2. How To Remove Blackheads In Ears With Warm Compress

Do you want to know how to remove blackheads in ears naturally and faster? Then try following

this tested and tried home remedy with the warm compress. A warm compress will help the

skin pores to expand and easily eases the impurities that are clogged in the pores.

You need to prepare:

1 washcloth 1 cup of water

Directions:

Firstly bring water (1 cup) to a boil. Next, take the water out from the heat and then

soak in a washcloth. Take the washcloth out of hot water carefully and later squeeze out

the excess water. Take this warm washcloth compress and apply

it over your blackheads in ears for ten minutes. Repeat this way three times.

3. How To Remove Blackheads In Ears With Blackhead Extractor Tool

Again, do you want to know how to remove blackheads in ears immediately and naturally? Then opt

for this simple way.

You need to prepare:

1 blackhead extractor tool � tsp of rubbing alcohol

Cotton ball Required amount of benzoyl peroxide cream

Directions:

Firstly ensure to cleanse your skin as well as exfoliate the ear part carefully before

beginning the blackhead extracting procedure. Then, sterilize this blackhead extractor tool

using rubbing alcohol. Then, press down the extractor tool� loop

side firmly on the blackhead to let out all the impurities trapped inside your skin pore.

Stay away from using excessive pressure to remove the blackhead at once because it can

worsen your condition by causing scarring or infection of the skin.

After that, apply the required amount of benzoyl peroxide over the affected area. Repeat this

process once or twice to remove blackheads in ears.

4. How To Remove Blackheads In Ears With Baking Soda Scrub

Are you seeking alternatives for how to remove blackheads in ears? Then you should opt for

this homemade natural exfoliant with baking soda to clear blackheads. Baking soda not

only helps to treat acne scars but also helps to clear blackheads in ears. Baking soda can

remove blackheads in ears because it�s a gentle exfoliant and helps to balance the

pH levels of the skin.

You need to prepare:

1 tsp of baking soda � tsp of water

Directions:

Add a teaspoon of baking soda into a small bowl and add water drop by drop into the baking

soda while mixing it. Next, make a thick paste and apply all over

the affected part using this paste and gently massage with the help of your fingertips in

circular motions. Let the application dry completely for six

minutes. Finally, use lukewarm water to rinse off the application and pat dry the skin.

To remove blackheads in ear completely, you should follow this tip once every day for

3 to 4 days.

source credit vkool.com

For more infomation >> Natural Ways On How to Remove Blackheads In Ears - Duration: 3:56.

-------------------------------------------

Moisturising in Summer! - Duration: 4:46.

Welcome back, everyone!

Hope your week was good!

Last week we talked about moisturising in winter,

so it makes sense to talk about moisturising in summer this week!

But do we really need moisturising care in summer?

Surely our skin can't get as dry as in winter.

Well, that is a major misconception

that's quite detrimental for our skin!

Because summer requires just as much moisturising care as in winter.

We lose moisture content easily,

through one, from sweating of course.

Even the act of wiping our sweat away is abrasion on the skin.

Another way we lose moisture content is through extreme temperature changes

which we talked about last week,

like entering a cold building from the outdoor heat.

And UV ray from the blazing sun is also a major concern.

However, hot weather moisturising is nothing too fancy.

You can make little adjustments to your daily beauty routines,

make sure you are diligent in taking care of your skin,

then you are worry-free for hot weathers!

These are little adjustments (like, of course, cleansing is still a must)

be sure to use good products

that does not strip your skin of moisture during use.

And after applying moisturising products,

let them sit for a while before applying makeup.

This way you can pick up where the dryer areas are

and you can apply more moisturising products on them.

If you have cooling products, use them!

If not, use lotions with cotton pads to mimic the sensation.

We will be coming back to talk about summer product releases

when the time comes around, so that'd be another video for that.

Day time care is important,

like having good sunscreens to block off UV rays.

Cosmetics that moisturises are also recommended.

Night care is equally important

as you want to calm and cool your face down after a long hot day.

We also mentioned last week

that many of the products can be used regardless of season,

but we are introducing these

because they are particularly useful for summer.

If you apply makeup, know that

most of these products have been reviewed by Japanese users,

and they say that they help create a base

that allows putting makeup much easier even on hot days,

which is a big boon in our books.

For example, SUISAI's Skin Tightening Cool Lotion.

Oh yea, you already know it's going to be cooling to use,

just right for summer!

But its benefits do not end there.

It's meant to be extra moisturising,

with its fermented beauty ingredients, including soy milk ferment extract

and two different kinds of hyaluronic acid.

In addition, it has a tightening effect,

which definitely helps with pores and makeup application.

This lotion is scent-free and colourant-free.

It is also suggested that we use powder on our faces and necks

to control sebum and sweat, and thus protecting our makeup too!.

This will help give us that cool, relieving sensation.

Wakodo's powder one such recommendation.

Wakodo Siccarol-Hi may be a baby powder,

but it can used in many situations.

The Hi version is popular for its cooling sensation when applied.

Definitely use it to get that cooling feel not only on the face,

but also the neck.

It also removes excess water

and disperses heat from the skin surface.

So that would be the morning care.

Moisturising care continues at night with makeup removal.

Transino is a brand many know for their skin whitening products,

but their Clear Cleansing is getting some attention too.

There are number of benefits we'd expect from this.

This is makeup remover that is made up of 70% moisturising ingredients.

Not only does it removes excess oil and dead skin cells,

it is also formulated with Vitamin C and akebia extract.

It also contains glycyrrhizic acid

which helps relieve any inflammation,

and other beauty ingredients that are gentle on the skin.

We also want to introduce the Shiseido Elixir White Sleeping Clear Pack,

which is a moisturising mask pack that you use before you go to sleep.

Put it on the bedside, apply before sleeping,

and you'll be receiving three benefits of

moisturising, skin whitening and anti-aging.

It contains active whitening ingredients m-tranexamic acid

which controls the production of melanin,

and also prevents dullness and freckles.

The Sleeping Clear Pack also comes with a spatula for convenience.

Although we have introduced about 10 products for seasonal moisturising,

there a lot more products which are good for moisturising too.

If you have to remember one thing,

remember that the products you choose

needs to protect your skin fromlosing moisture,

and replenishes moisture content.

If you are new to the channel, how about subscribing?

If you are interested in Japanese products, and like to shop for them,

then our videos are definitely up your alley.

We share these information on a weekly basis,

so by subscribing you won't miss future episodes.

Thank you again for watching our video thus far!

We'll see you in the next video, till then, stay happy and smile!

For more infomation >> Moisturising in Summer! - Duration: 4:46.

-------------------------------------------

Rasoi Special- Corns, Oats and wheat crispy paratha - Duration: 7:48.

Rasoi Special- Oats, Corn and Wheat flat bread

1 cup wheat flour, 1/2 cup dry roast oats, olive oil, 2 table spoon gram flour and 1 cup boiled corns

1 table spoon dry fenugreek leaves

1 tea spoon Red Chilly Powder

1 Tea spoon Garam Masala

1 Tea Spoon dry Mango Powder

1 chopped green chilly

Grind the roasted oats

Make a fine powder

Make a dough of Oats and wheat flour

1 table spoon of Olive oil and Put a Pinch of Salt

Mix well and make a dough

Sprinkle little by little water and prepare a soft dough

Apply little clarified butter

To prepare stuffing, heat a pan

Put 1 Table spoon of Olive Oil

Put 1 cup boiled corns and let it fry for 5 minutes

Let it cool fried corns

then grind the corns

Roast the gram flour till release its aroma

Put dry fenugreek leaves

Put all the spices now

Mix them well

put salt as per your taste

take a small roll

Put 2 table spoon of stuffing and roll again

Once skillet is warm enough grease it with clarified butter

Put bread on skilet

now prepare another bread likewise

grease it with clarified butter

grease on both the sides

Corn oats and wheat flat bread in ready to serve

This is not only healthy but also taste too good

Please try an give your valuable feedback

Thank You

For more infomation >> Rasoi Special- Corns, Oats and wheat crispy paratha - Duration: 7:48.

-------------------------------------------

Everything You Need to Know About Bursitis - Australia 360 - Duration: 8:31.

Everything You Need to Know About Bursitis

The human body is highly prone to localised inflammations that can be related to many factors.

 A clear example of this is bursitis, an uncomfortable and painful disease, which is much more common than people think.

Synovial bursa.

Also known simply as a bursa, this is a bag or sac wrapped in synovial tissue and viscous fluids, located in various parts of the body.

Although it's very small, it's main function is extremely important, since it prevents friction between bone ends.

Thus, it prevents diseases such as arthritis or osteoarthritis.

In simpler words, a bursa is a kind of pillow for the bones.

A disease related to bursae is bursitis, a condition which few people know about but is actually quite common.

What is bursitis?.

Moving on from this background knowledge, bursitis is the inflammation of the synovial bursa.

It can also refer to irritation of the bursa.

This condition tends to affect the joints in:.

Heels Elbows Wrists Shoulders Knees Pelvis Knuckles (both in hands and feet).

Types of bursitis.

Despite being a seemingly simple problem, bursitis can be divided into two major types:.

Acute.

This is characterised by red colouration of the skin and a slightly higher temperature in relation to the rest of the body.

Normally this is a case of infection.

Chronic.

This doesn't actually differ much from acute bursitis.

It's actually the evolution of prolonged acute bursitis.

In this case the pain and redness are much more marked.

As to the potential causes, it can be due to previous joint injuries.

Causes of bursitis.

Virtually anyone can suffer from bursitis.

However, the most affected are the elderly.

In this case, the main cause of this condition is the overuse, or rather, the repetitive movement of the joint.

Therefore, people who take part in certain repetitive activities are also affected.

Because of this, many different people, from swimmers to carpenters, have an elevated risk of developing bursitis.

On the other hand, direct injury and some diseases, such as gout, can also cause it.

How to recognise bursitis?.

It's not very difficult to recognise this disease, and even less if it's in a person who performs a lot of repetitive movement on one or more joints.

Although the symptoms depend on where the problem occurs, the most likely are:.

Stiffness Tenderness around the affected joint Swelling Redness Joint pain Fever (in more serious cases).

What to do?.

The pain, the inflammation and the discomfort cause us to look for remedies of any kind.

However, the most appropriate thing, first of all, is to go to a medical professional.

Once they've made an official diagnosis, you should follow their recommendations to the letter.

Then we can look at different natural remedies to complement the medical treatment.

Apple cider vinegar.

This is considered to be the daddy of bursitis remedies due to its main properties.

Apple cider vinegar helps reduce inflammation as well as to providing protein to the body.

Ingredients.

½ cup of apple cider vinegar (125 ml) 1 tbsp.

of honey (25 g). Preparation and use.

Mix the vinegar and honey in a bowl.

Soak a towel or absorbent cloth in the mixture.

Apply it on the affected area and leave it to act for 15 minutes.

Ginger.

Ginger is distinguished for its analgesic and anti-inflammatory properties.

It also helps blood circulation which is directly related to bursitis.

Ingredients. 3 tbsps.

grated ginger (30 g) ½ cup hot water (125 ml).

Preparation and use.

The ginger can be grated at home or can be bought ready-grated.

Wrap it in a gauze or cloth (neither too thin nor too thick) and then submerge it in hot water.

Wait a couple of minutes to allow it to steep in the water.

Apply the hot gauze on the affected area, being careful not to burn yourself.

Leave it to act for 15 to 20 minutes.

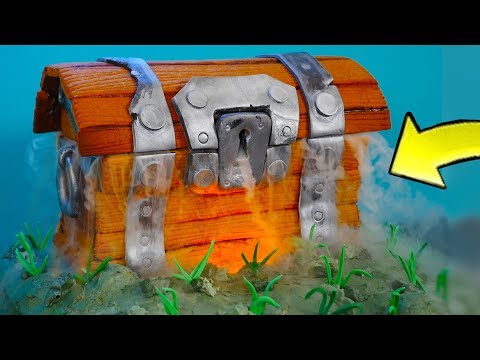
Không có nhận xét nào:

Đăng nhận xét